Necessity is the mother of invention
Although I haven’t invented anything, necessity has sure been the driving force for this post. A few of us share a common Novell mailbox at work. Since archiving is done locally on a single machine, it is not available to others. Tired of this, I migrated to Thunderbird a couple of months back. I set up my mailbox, created folders & message filters and a back-up utility. The only thing missing was my address book. While in Groupwise, names would auto-complete. So I went on to find a solution!
In the options tab, I found a provision for mapping to a directory but with the settings I tried, it wouldn’t work. It was getting on my nerves as I manually had to type out addresses when writing to new people. So I started off once again, this time equiped with information attested by my network administrator.
Let us take you through the steps involved while mapping Active Directory in Thunderbird:
0. Connection details
Its worth following this tutorial only if you have the necessary details of the AD Server, and an active login in the directory with enough permissions to read information from AD. Most AD Servers are configured to allow read to users authenticated on the domain.
When talking to your network guy, ask for the hostname/IP of the directory server and the Base DN. Don’t let jargon daunt you! Assuming that Ram has a login name ram.kumar on contoso.com domain, the base DN would be DC=contoso, DC=com. Although this is not comprehensive or full-proof logic, it should work at most times. Also, confirm if you are required to use SSL (secure connections).
1. Too many options…?
Start the set-up by finding the option under Tools > Options > Composition [top-level tab] > Addressing [inner tab]
Check mark ‘Directory Server‘ and click on the ‘Edit Directories…‘ button
Click ‘Add‘ to configure a new server

2. Configuration
Details are just what we got from the network guy. Continuing with the above example:
Name: Some Name (Any name to identify the server in your address book)
HostName: ADSERVER.contoso.com [OR] 172.16.126.30
Base DN: DC=contoso, DC=com
Port No: 389 (unless using SSL)
Bind DN: [nohide]ram.kumar@contoso.com[/nohide]
(this is not your email address, its your login name @ your company’s domain)

3. Advanced Options
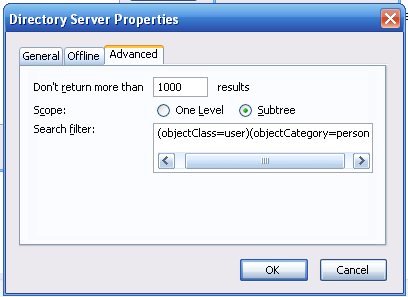
Move to the ‘Advanced‘ tab on the same form and configure as follows:
Don’t return more than: 1000 results
(set depending on the no of people listed in your directory, any number will work, may just slow down the retrieval a bit)
Scope: Sub-tree
(one-level selects the top-level only which mainly includes groups and OUs)
Search filter: (&(objectClass=user)(objectCategory=person))
(use this query to restrict results to entries that are categorized as person or user; this will neglect any groups defined. I also use the same query in my .Net code when I want to get details for a person)

4. Local copy
The ‘Offline‘ tab on this form has the option to download a local copy of the directory. But it didn’t work for me. It always errs ‘Replication failed‘ (shown below). I looked up the internet to find an intelligent reply to this thread, who studied the log of the query that Thunderbird sends to the AD server. The query misses out the Bind DN, which is the AD server cannot authenticate the machine requesting data. So let go off it!

5. Saving it all!
Click ‘OK‘ to save this entry, and it should show up in the list of directories. Select this entry as your Directory Server on the Composition/Adressing tab in the main Options window. Click ‘OK‘ to close the Options form.

6. Using the address book
I tried but somehow my contacts wouldn’t show-up in my Thunderbird Address Book. So I downloaded this lite plugin called Contacts Sidebar that displayed my contacts right inside left pane in the main window. In case your contact do not immediately show, select another Address Book, and then reselect ‘Some Name’ (just to wake up the contacts sidebar)

That’s all folks!
Special thanks to my friend and friendly-network-guy, Samir Matondkar for providing necessary network information, without whom I couldn’t have achieved this feat.